Media Sync Editor
This guide is about the Media Sync Editor we provide as part of our Playground.
To use alphaTab together with external media like audio or video backing tracks, it is often needed to somehow synchronize the two parties due to inconsistencies. It is rather rare that the music sheet and the used backing track 100% align in timing. There might be intros, outros slight time differences which need to be accommodated for.
The Media Sync Editor provides an online editor for exactly this task. You can load your music sheet and your backing track. The editor then offers features to eliminate potential differences of the two.
Before we go into the details, first an overview on the general features and recommendations.
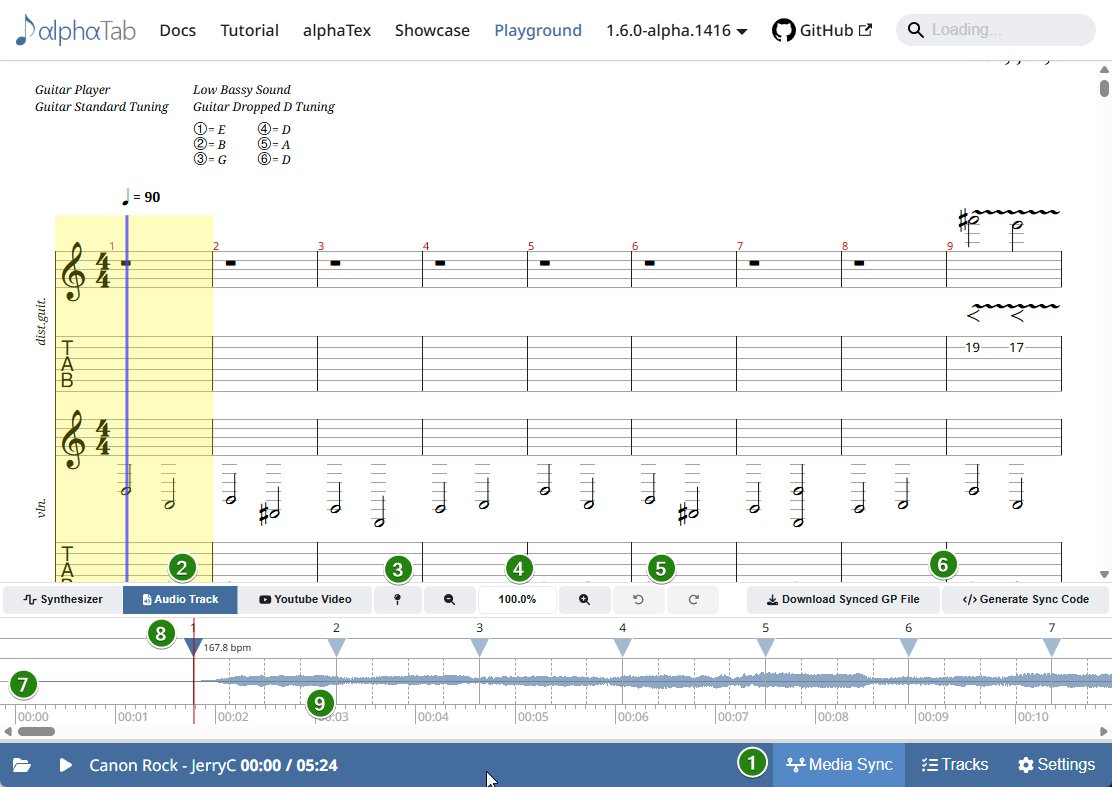
- (1)
- (2)
- (3)
- (4)
- (5)
- (6)
- (7)
- (8)
- (9)
(1) Media Sync Editor
The Media Sync Editor can be accessed on the bottom right side of the playground. When clicking on the button the editor toggles. Closing the editor will reset the editor but most relevant information is generally remembered within the playground. Re-Opening the editor after closing should show again the correct details, but aspects like zoom or undo/redo are reset.
(2) Player Mode
This area allows to change the player mode within the playground to synchronize the song.
- Synthesizer enables again the use of the built-in synthesizer for playback.
- Audio Track enables loading of a local audio (or video) file from which the raw audio will be used.
- YouTube Video enables loading a YouTube Video.
You can switch between the modes and any sync points are remembered in the playground.
(3) Sync Point Actions
This menu provides some handy actions for sync points.
(4) Zoom
To align the song precisely it is often required to zoom deeper into the audio. With this zoom level the time axis of the editor is stretched or condensed for more precise sync point editing.
(5) Undo
The editor will remember individual edits done to the sync points. You can undo/redo those changes in case you made a mistake.
(6) Export
Once you have synced the file, you can use these export actions to download your synced file. You can either export a Guitar Pro 8 file or generate some custom source code to add to your project for enabling the synchronization as configured.
(7) Waveform
When you load a local audio or video file, the editor will show a visual waveform in the central space. This is very useful to identify spots in the audio where sync points should be placed. Unfortunately YouTube doesn't allow access to the raw media. That's why the waveform will be empty in this case.
(8) Masterbar / Measure Sync Points
These are the main sync points for masterbars (aka. measures). The main synchronization happens on a bar level. Sync points can be active or inactive.
If they are active they have a dark blue arrow-head and show a BPM value beside it. Active sync points can be dragged to the right spot in the audio where the related bar is expected to be played. To activate or deactivate any sync point doubleclick it and it will be toggled.
Inactive markers are placed automatically according to the time axis and BPM of the song. They are having light blue arrow heads.
If there are repeats or jumps in the song the repeat counter is shown in parenthesis behind the bar number above the arrow head. For the first occurence no repeat number is shown.
(9) Time Signature Sync Points
While the internals of alphaTab support any dynamic placement of sync points, the editor provides only the option to add additional sync points following the time signature.
e.g. on a 4/4 time signature, you will notice additional three dashed lines marking the individual metronome ticks of the bar. These sync point markers can be activated with a doubleclick like masterbar sync points.
Synchronizing Songs
The more complex the song, the more time is needed for synchronizing it properly. But assuming that your music notation and your audio should generally match the effort of synchronizing can be reduced drastically if done correctly.
The first two most important steps are applied by the editor when you load an audio file:
- Create Sync Points according to the audio start and end
- Create Sync Points for all tempo changes and place them according to the played speed.
If the music notation and audio match, you typically do not need any more sync points than these to get already a decent result. If there are some further inaccuracies they might need correction. Typical problems and solutions are:
Problem: In live recordings when the band improvises. In this case obviously the music notation might not match if they decide to stretch the solo or repeat a chorus.
Solution 1: Best would be to adjust the music sheet to match again the actually played parts.
Solution 2: Pick any bar(s) and make them artificially slower/faster to pick up the right spot when the music sheet matches again. e.g. you might use a time signature marker to have the bar mostly shown correct, and then stretch this bar as long as needed until the band continues normally.
Problem: There are instruction parts where a teacher might explain something inbetween.
Solution 1: If you manually control the external media synchronization (via IExternalMediaHandler) you could adjust the time reported to alphaTab so that it quasi stops playing and moving the cursor.
Solution 2: Add an empty bar in the song for the time of this explanation and then stretch this part accordingly with sync points.
Solution 3: Stretch an existing bar by using the time signature markers.
Problem: The audio is from a cover which is not played accurately and there are slips in tempos. This can be on purpose for artistic purposes (e.g. swing style or improvisation) or accidentally.
Solution: First add bar markers before and after the affected bar. Then additionally place time signature markers according to the real playback.
Generally it is discouraged to add too many markers (e.g. for every bar). It's unlikely that the tempo changes constantly and needs adjustment. Rather pick a range where you expect the tempo to be roughtly equal, mark it with two sync points and place them accordingly.
The general recommendation to place markers correctly is:
- Seek the player to some bars before the spot where the marker should roughly be. This can be done by clicking at the right spot in the music sheet or in the wave form.
- Start the playback but rather ignore what you see on the cursor and music sheet. Listen closely and watch the playback cursor in the waveform.
- When the right note/chord is played remember the position on screen.
- Move the sync point marker to the spot.
- Repeat the playback again and check if the spot matches. If required zoom in and tweak the precise position a bit.
- Seek the player back to the previous sync point and let the song play until your new sync point.
- Check if the cursor and audio now match up.
Repeat this for all markers until things match up. Then continue with any fine-tuning on time signature marker level if required.
You can change the playback speed in the Settings panel if songs are too fast.